|
- This version now has the ability to create .pdf files which you can use to send
your quotes by email to your client. You MUST have Adobe Acrobat Reader installed
on your computer which can be downloaded for free from www.adobe.com. **PLEASE
NOTE, This is not for the purposes of sending your orders to North Star**
- If you have a computer mouse with a "scroll wheel", please do NOT use the scroll wheel in Winsys Lite
- If you are on the "CAD View" screen and change any grid lines, do NOT hit the "Save" button
- GRILLS
… The "Auto Grill" section of the program are suggestions only.
It is the dealer’s responsibility to pick the grill pattern
- Order documentation may not work with Windows XP. If you need this (not
many do) please contact Sheldon for instructions
Top
|
|
|
| |
INDEX:
Application Setup
Creating a Markup/Pricing Setup
Creating a Tax Profile
Creating Non North Star Product Charges
Creating a Customer Master File
Creating an Estimate / Placing an Order
To Change / Add / Delete Line Items or Options
Global Changes
Backlog Functions – Clock / Calendar Icon
REFERENCE SCREENS:
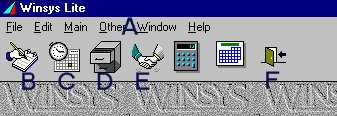
Main Screen Icons (Fig. 1)
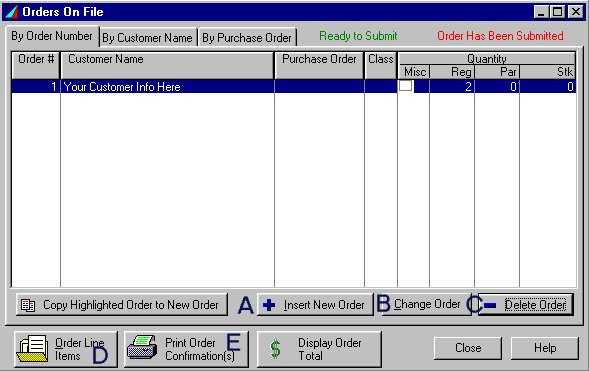
Orders on File (Fig. 2)
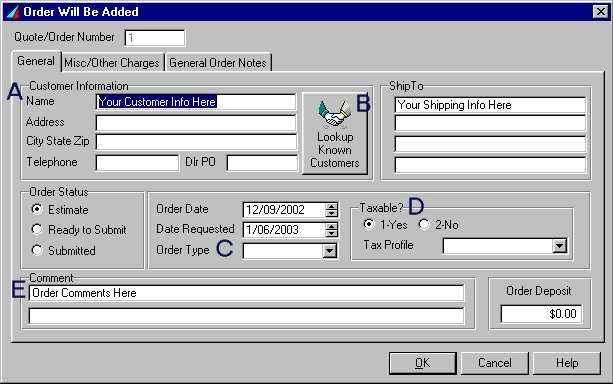
Order will be Added (Fig. 3)
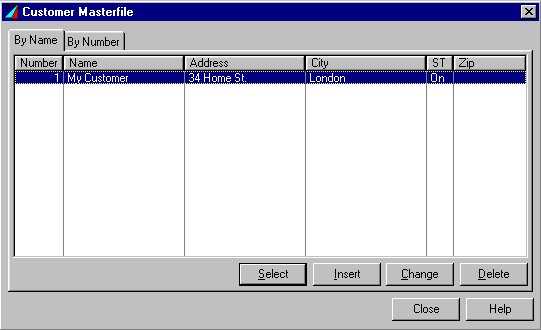
Customer Masterfile (Fig. 4)
Line Items on Order (Fig. 5)
Configurator Order Entry (Fig. 6)
System Wide Options Update – Pricing Information (Fig. 7)
General Pricing Information (Fig. 8)
United Inch Pricing Information (Fig. 9)
Cost Adjustment (Fig. 10)
Creating New Dealer Defined Charges (Fig. 11)
Adding a Dealer Defined Charge (Fig. 12)
System Wide Options Update – General Information (Fig. 13)
System Wide Options Update – Graphics / Export Options (Fig. 14)
Adding New Customer Information (Fig. 15)
Adding a New Tax Profile (Fig. 16)
Backlog Inquiry (Fig. 17)
|
|
| |
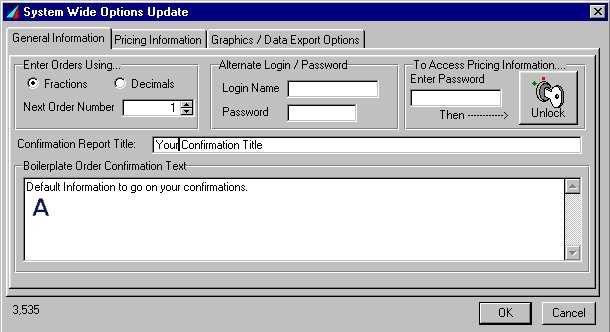
From the "Winsys Lite" menu, click "Other" and select "System Profile".
Enter information under "General" tab.
"Boilerplate Order Confirmation Text" (Figure 13:A).
This box allows you to enter any contract information that you would
like to show on your quote form (ie: "quote valid for 30 days", "10-day
cooling off information", etc.). **If you have an existing contractual
document that you would like to import into Winsys Lite you can
highlight your document then press Ctrl c (at the same time) then click
on the boilerplate and press Ctrl v (at the same time).
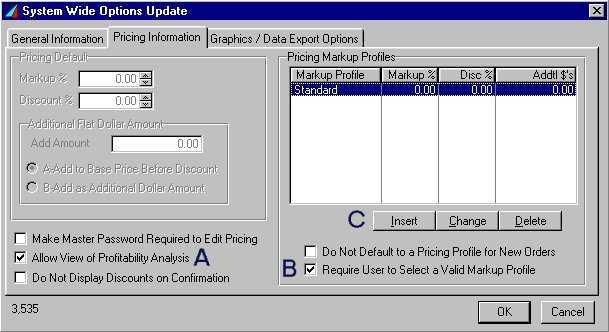
To set the password for "Access Pricing Information", click the "Pricing Information" tab, and click on "Make Master Password Required to Edit Pricing". You can create your prices, and in turn could load a salesman for example. The "Pricing Information" tab would only be available with the password.
Also check the "Allow View of Profitability" (Figure 7:A) and "Require User to Select a Valid Markup Profile" (Figure 7:C) boxes.
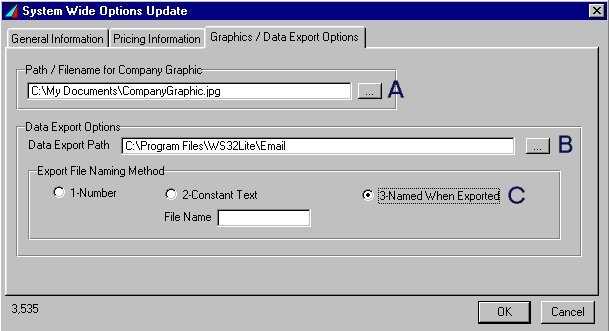
GRAPHICS / DATA EXPORT OPTIONS:
Under this tab, you have the ability to put the "Path" (Figure 14:A) to insert your company logo on your quote form.
Also on the "Data Export Options", box under the "Data Export Path" (Figure 14:B), you will enter the path which you would use to hold orders for emailing to North Star:
C:\Program Files\WS32Lite\Email
Under the "Export File Naming Method" (Figure 14:C), always choose "(3) – Named When Exported".
To place the order, the file must be emailed to: orders@northstarwindows.com
|
|
| |
Index
|
|
| |
1) To create an "Order Type / Markup Profile", click "Insert" (Figure 7:B).
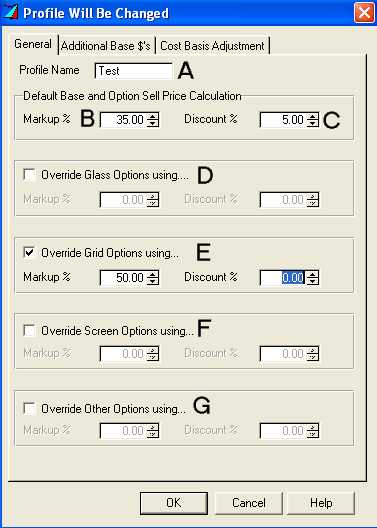
Enter a "Profile Name" (Figure 8:A) then a "Markup Percentage" (Figure 8:B). You have the option to enter a "Discount" (Figure 8:C). Please note, the discount is from you to your customer.
If you would like to markup an option type differently from your base markup you must check any of the "Override" (Figure 8:D-G) checkboxes then fill out the appropriate percentages.
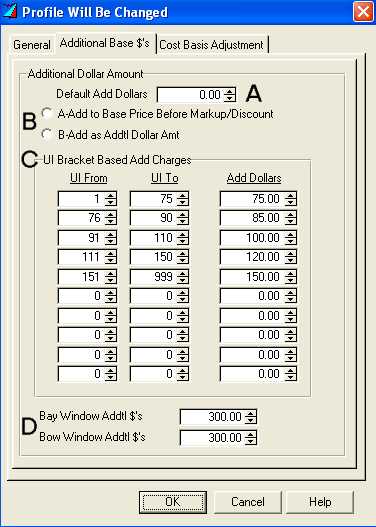
2) Click the "Additional Base $’s" tab.
If you would like to add a flat rate to your total you can enter the amount you would like to increase each base product by (Figure 9:A) and choose to either add the rate before or after any discounts you may give to your customer (Figure 9:B).
To add dollars based on a United Inch system, enter the ranges in
United Inches and the rate you wish to have applied to that range (Figure 9:C).
If you would like to add a flat increase to bays/bows enter the value for each (Figure 9:D).
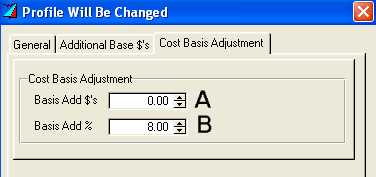
3) Click on the "Cost Basis Adjustment" tab.
To adjust the COST of your product from North Star you may choose a flat rate (Figure 10:A), percentage (Figure 10:B) or both.
This creates a "Markup", not a "Margin".
| |
| |
Index
|
|
| |
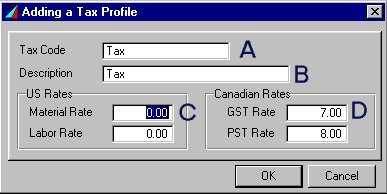
From the "Winsys Lite" menu, click "Other" and select "Tax Profile".
Click "Insert", and under "Tax Code" (Figure 16:A) and "Description" (Figure 16:B), enter the same valid information (ie: “supply only”).
Enter the "American" (Figure 16:C) or "Canadian" (Figure 16:D) taxes as appropriate.
You will generally only have 3 or 4 tax codes.
| |
| |
Index
|
|
| |
- If you would like to create pricing for non-North Star items on your quote, (ie., steel door), select "Other" (Figure 1:A) and click "System Profile".
- Select the "Pricing Information" tab.
- Click on the "Allow View of Profitability Analysis" button (Figure 7:A).
- Click "OK".
- After screen closes, again click "Other" (Figure 1:A) on the menu and select "Dealer Defined Charges"
.
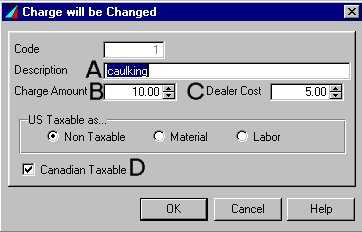
- On the next screen select "Insert" and in the "Description" box (Figure 8:A), enter your product (ie: steel door).
- Under "Charge Amount" (Figure 8:B), enter the dollar value you would charge your customer. This amount includes all "costs and markups", excluding "taxes".
- Under "Dealer Cost" (Figure 8:C), enter your costs (ie: material, material tax, labour).
- To charge taxes on the product check the box (if Canadian).
- Click "OK" and close the screen. Items will be listed.
- If you would like to adjust any pricing, repeat the above by first selecting "Change".
| |
| |
Index
|
|
| |
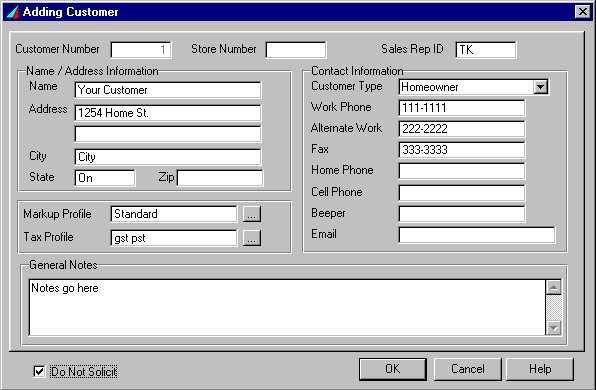
Click the "Customers" (Figure 1:E) button.
Click "Insert" to create new customers.
Enter the address, contact information, and any general notes for that customer (Figure 15).
On the "Tax Profiles" page, click "Insert", and under "Tax Code" and "Description", enter the same valid information (ie: "supply only"). You will generally only have 3 or 4 tax codes.
The "Store Number" would only apply if there was more than one location.
The "Sales Rep ID" would only apply if you have sales reps and wish to assign a particular customer to a particular Rep.
The "Do Not Solicit" button would be used during mail outs.
| |
| |
Index
|
|
| |
- Click the "Enter/Edit Customer Orders" (Figure 1:B) button.
- Click "Insert New Order" (Figure 2:A).
- Press "Tab" on your keyboard.
- Under "General" tab, enter customer information. If you are creating a new customer, you will have to select an "Order type" (Figure 3:C).
This will be the type of selling mode you would have wanted for this
particular customer. This mode would have been created earlier, and you
would select each mode by clicking the drop down box. At this point,
you should also select the "Tax Profile" (Figure 3:D) from the drop down list. If you forget Tax Profile after clicking OK, you must go back & click "Change Order"
button. This also would have been created earlier. If you want to add
any additional information pertaining to this order, enter it under the
"Comment" (Figure 3:E) box and click "OK".
- For Existing Customers, click "Look up Known Customers" (Figure 3:B), highlight the desired customer (Figure 4), and click the "Select" button. Your overall information will already have been pre-entered (ie: taxes, etc.).
Entering Miscellaneous Parts Or Non – North Star Product To Your Quote:
- Click the "Enter / Edit Customer Orders" button (Figure 1:B).
- Click "Insert New Order" (Figure 2:A).
- Press "Tab" on your keyboard.
- Complete all required information under the "General" tab.
- Select "Miscellaneous / Other Charges" tab & click "Insert".
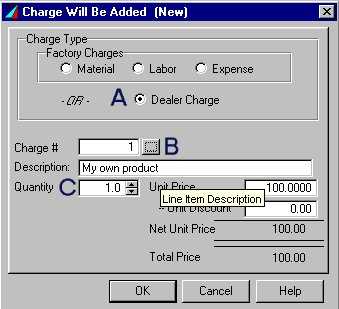
- Select the "Charge Type" (Figure 9:A) (ie: "Factory Charges" or "Dealer Charge"), and then click "Selection" button (Figure 9:B) beside the "Charge #" box.
- Select "Qty. etc." (Figure 9:C) and click "OK".
To Add a Non North Star Product Into an Existing Customer Quote:
- Click "Enter / Edit Customer Orders" (Figure 1:B) and when your "Orders on File" screen appears, highlight your customer’s name.
- Click "Change Order" (Figure 2:B).
- Select "Miscellaneous / Other Charges" and follow procedure outlined above.
As non North Star items do not appear on the "Line Items on Order" screen, you can look at your quote by clicking the "Print Order Confirmation(s)" button (Figure 2:E), and select "View on Screen".
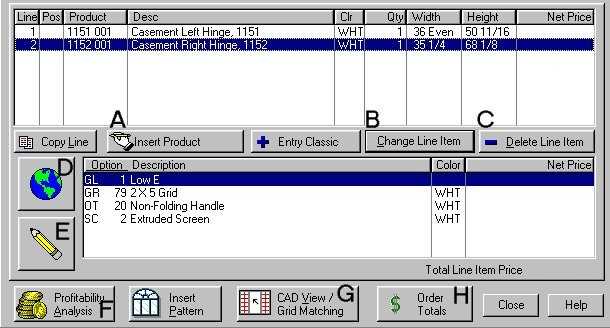
THE "LINE ITEMS ON ORDER # ??? FOR (YOUR NAME)" SCREEN:
- Select "Configurator Entry" (Figure 5:A).
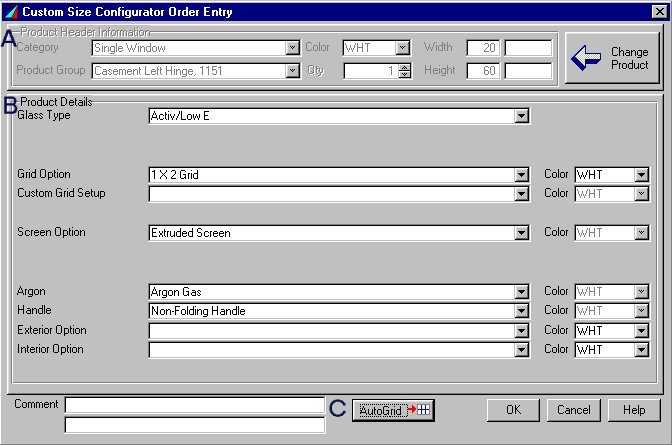
- Select "Category" (Figure 6:A) (ie: single, shape, etc.).
- Under "Product Group", select type (ie: double hung).
- Add: colour, quantity, width, height.
- Click "Enter Details" button, and on the next screen, enter appropriate "Product Details" (Figure 6:B).
- Grills for any window "Except Shapes" can be calculated at this point by selecting "AutoGrid" (Figure 6:C), or you can select from the grids drop down box.
- Click "OK", and on the next screen will be displayed each line item product
- If you click the "Close" button by mistake, click "Order Line Items" (Figure 2:D) and you will return to "Line Items On Order #.." screen.
For additional windows, repeat the above process until the order is
complete and you don’t wish to view any of the units, then click "Close" button.
To view the total price of any pattern (bay, bow, coupled) click on the base of that unit and click "Order Totals" (Figure 5:H) and choose to view the Pattern.
After the windows have been created in the order, and you would like to view a particular unit with grills...
- Select "Line Item" to be viewed.
- Click "Cadview / Grid Matching" button (Figure 5:E).
The program will show you a scaled drawing that you have the option to
view or print. You can rearrange the grills for viewing purposes only.
Miscellaneous charges such as "Non North Star Items" or miscellaneous "North Star Materials" will not show up as a line item, and can be viewed on the order on screen.
On your "Orders on File" screen, highlight your customer, and, before printing or e-mailing your order, you can view the order by clicking the "Print Order Confirmation(s)" button (Figure 2:E). A "Print Request" screen will pop up. Choose "Single" and on the next pop up, choose "View on Screen".
| |
| |
Index
|
|
| |
- Click the "Enter / Edit Customer Orders" button (Figure 1:B).
- Press the "Order Line Item" button (Figure 2:B).
- Select a Line # to change and click the "Change Line Item" button (Figure 5:F).
- To
change a model, hit selection button and change to appropriate model.
By doing this, you will lose all information pertaining to the previous
model.
- By selecting the "All Models" tab, you are able to "Sort By"
model, description, you can type your model (ie: "D"), and the program
will proceed to product type. After this is done, you will have to
reselect your options that are not available in the "Global" option list. You must click the "Calculate Price" button to price windows and options.
If you would like to "Delete" a line item, simply select the line and click the "Delete" button. To delete non-North Star items or North Star parts, highlight your line item and click the "Change Order" button. Select "Miscellaneous / Other Charges" tab. When your options appear, highlight as required and click "Delete" button.
| |
| |
Index
|
|
| |
Click the "Enter / Edit Customer Orders" button (Figure 1:B). Click "Order Line Items" (Figure 2:D).
For changes affecting the entire order, click the "Globe" (Figure 5:B) and select the appropriate option. You would normally be selecting the "Global Colour Change" or "Global Option Substitution".
If you have more than one (1) option to globally change, and the "Re-price Order?" question comes up, click "No, thanks", and then continue making global changes. Once all global changes are done you can select "OK" when the "Re-price Order?" appears and all options will be re-priced.
For example, if you are replacing a 1-3/8" vinyl jamb with a 4" oak jamb, you would select the "Add 4-5/8" oak and jamb extension to all windows". To enter your exact jamb, you must click "Change Line Item" (Figure 2:B), and on the next screen, pick "Pricing / Other" tab, and under "Comments",
enter the appropriate wood dimension (ie., 4"). This step must be
repeated for each window. When you are selecting certain options, you
may have to click the "Option(s) Will Be Replaced" button to equal the number of units in your order.
| |
| |
Index
|
|
| |
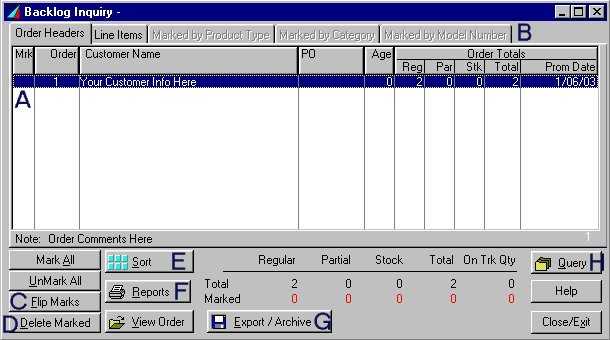
Click "Backlog (Scheduling)" (Figure 1:C).
Under "Backlog Parameters", select appropriate button for the orders you would like to view.
You have the ability to sort your order by various parameters by clicking the "Sort" button (Figure 17:E). You can also "Mark" (Figure 17:A) your orders as a sorting procedure by double-clicking the line item you wish to mark.
If you have marked your orders, you now have the ability to view your line items by clicking the tabs marked: "Product Type", "Category" and "Model #" (Figure 17:B).
After you have marked your orders, you have the ability to click the "Reports" button (Figure 17:F), and create a paper version of the product type.
If you click the "Export / Archive" button (Figure 17:G), you will be able to export marked orders to either an "Excel Spreadsheet", as a backup, or to export "To the Factory" to email your order to North Star.
When you click "To the Factory", you must input your file name in the appropriate box.
If you would like to see the orders that have been sent to North Star, click "Query" (Figure 17:H), and choose the "Submitted" button.
After you have completed your job, you can go to the "Backlog Inquiry" (Figure 1:C) and mark those orders. Click the "Export / Archive" button (Figure 17:G), and move those orders to history. When you close your window and reopen, the orders sent to history will not appear on the "Backlog Inquiry List".
After you have sent your order to history, you can check the Archive, "Archived Orders" (Figure 1:D)
to see which orders have been sent to history. This function could be
used to retrieve orders at a later date (ie: service or to reprint
invoices, etc.).
FLIP MARKS:
This button (Figure 17:C)
is a time saver. If you have more orders to be marked than those you
did not wish marked, you could mark those orders you do not wish marked
then "Flip" them.
DELETE MARKED:
This button (Figure 17:D) only removes marked items from view.
| |
| |
Index
|
|
| |
|
|
| |
|
|
| |
Index
|
|
| |
|
|
| |
|
|
| |
Index
|
|
| |
|
|
| |
|
|
| |
Index
|
|
| |
|
|
| |
|
|
| |
Index
|
|
| |
|
|
| |
|
|
| |
Index
|
|
| |
|
|
| |
|
|
| |
Index
|
|
| |
|
|
| |
|
|
| |
Index
|
|
| |
|
|
| |
|
|
| |
Index
|
|
| |
|
|
| |
|
|
| |
Index
|
|
| |
|
|
| |
|
|
| |
Index
|
|
| |
|
|
| |
|
|
| |
Index
|
|
| |
|
|
| |
|
|
| |
Index
|
|
| |
|
|
| |
|
|
| |
Index
|
|
| |
|
|
| |
|
|
| |
Index
|
|
| |
|
|
| |
|
|
| |
Index
|
|
| |
|
|
| |
|
|
| |
Index
|
|
| |
|
|
| |
|
|
| |
Index |
|
| |
Top |
|